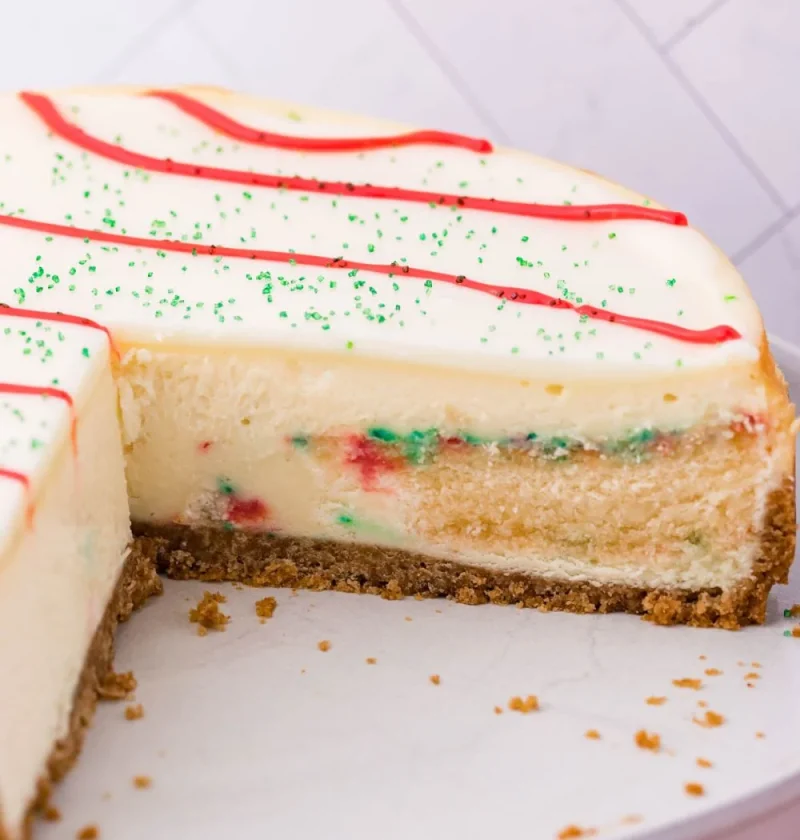
Get into the holiday spirit with this delightful and festive Little Debbie Christmas Tree Cheesecake! Combining the nostalgic charm of Little Debbie Christmas Tree Snack Cakes with a creamy and luscious cheesecake base, this recipe is a true crowd-pleaser. The rich flavors of cheesecake perfectly complement the fun and whimsical nature of the iconic snack cakes, making it a wonderful treat for both kids and adults alike. Whether you’re hosting a holiday party or simply want to indulge in a festive dessert, this recipe will bring joy and cheer to your taste buds.
- Difficulty: Intermediate
- Prep Time: 30 minutes
- Cooking Time: 1 hour 15 minutes
- Serving: 8-10
- Yield: 1 cheesecake
- Calories: Approximately 350 calories per serving
Ingredients:
- 2 cups graham cracker crumbs (240g)
- 1/2 cup unsalted butter, melted (113g)
- 24 Little Debbie Christmas Tree Snack Cakes
- 24 ounces cream cheese, softened (680g)
- 1 cup granulated sugar (200g)
- 1 teaspoon vanilla extract
- 4 large eggs
- Green food coloring
- Assorted holiday sprinkles for decoration
Equipment:
- 9-inch (23cm) springform pan
- Mixing bowls
- Electric mixer or stand mixer
- Spatula
- Piping bag with star tip (optional)
Step-by-Step Guide:
Step 1: Preheat your oven to 325°F (163°C). In a mixing bowl, combine the graham cracker crumbs and melted butter. Press the mixture evenly into the bottom of the springform pan to create the crust.
Step 2: Arrange the Little Debbie Christmas Tree Snack Cakes upright along the inner edge of the pan, pressing them lightly into the crust. The snack cakes should be standing upright, resembling a festive Christmas tree.
Step 3: In a large mixing bowl, beat the cream cheese, sugar, and vanilla extract until smooth and creamy. Add the eggs, one at a time, and continue beating until well combined.
Step 4: Add a few drops of green food coloring to the cream cheese mixture and mix until the desired shade of green is achieved. This will give your cheesecake a vibrant Christmas tree color.
Step 5: Pour the green cream cheese mixture into the prepared crust, filling the pan evenly. Smooth the top with a spatula.
Step 6: Bake the cheesecake in the preheated oven for approximately 1 hour and 15 minutes, or until the edges are set and the center is slightly jiggly. Turn off the oven and let the cheesecake cool in the oven for 1 hour.
Step 7: Once cooled, remove the cheesecake from the oven and refrigerate for at least 4 hours or overnight to set.
Step 8: Before serving, decorate the top of the cheesecake with assorted holiday sprinkles, creating a festive and whimsical look. If desired, you can also pipe whipped cream or cream cheese frosting using a piping bag and star tip to resemble Christmas tree decorations.
Tips and Tricks:
- To easily press the graham cracker crust into the pan, use the bottom of a measuring cup or glass to firmly press the mixture down.
- For a smoother texture, make sure the cream cheese is completely softened before mixing. Take it out of the refrigerator in advance to bring it to room temperature.
- If you prefer a stronger vanilla flavor, you can add a touch of peppermint extract to the cream cheese mixture for a festive twist.
- To prevent cracks on the surface of the cheesecake, avoid overmixing the batter and make sure to cool the cheesecake gradually by following the cooling process in the recipe.
Nutritional Information:
- Calories: Approximately 350 calories per serving
- Fat: 20g
- Carbohydrates: 38g
- Protein: 6g
- Fiber: 1g
Final Thoughts:
The Little Debbie Christmas Tree Cheesecake is a delightful and whimsical dessert that brings the joy and flavors of the holiday season to your table. With its creamy texture, vibrant green color, and the added charm of Little Debbie Christmas Tree Snack Cakes, this cheesecake is a guaranteed hit at any festive gathering. Spread the holiday cheer and indulge in this delightful treat that combines the best of both cheesecake and nostalgic snack cakes.
FAQ:
Q1: Can I use a different type of snack cake for this recipe?
A: Absolutely! While the recipe calls for Little Debbie Christmas Tree Snack Cakes, you can get creative and use other festive snack cakes or even homemade cake pops to decorate the cheesecake.
Q2: Can I make this cheesecake in advance?
A: Yes, this cheesecake is perfect for makingahead of time. You can prepare it a day in advance and store it in the refrigerator until ready to serve. The flavors will continue to develop and the cheesecake will set nicely.
Q3: Can I freeze the cheesecake?
A: Yes, you can freeze the cheesecake for up to one month. Make sure to wrap it tightly in plastic wrap and place it in an airtight container before freezing. Thaw it in the refrigerator overnight before serving.
Q4: Can I use a different food coloring?
A: Absolutely! Feel free to use any food coloring you prefer or even combine different colors to create unique shades for your Christmas tree cheesecake.
Q5: Can I substitute the graham cracker crust with a different type of crust?
A: Yes, you can experiment with different crusts if you’d like. Oreo cookie crust or shortbread crust would both be delicious alternatives.
Q6: Can I add additional toppings to the cheesecake?
A: Of course! Apart from sprinkles, you can add crushed candy canes, chocolate shavings, or even drizzle some caramel or chocolate sauce over the top for extra indulgence.
Q7: Can I make mini individual cheesecakes instead of one large cheesecake?
A: Absolutely! You can use a muffin tin lined with cupcake liners and follow the same steps, adjusting the baking time accordingly. Mini Christmas tree cheesecakes will be a hit at any holiday party.
Q8: Can I use a different type of cream cheese?
A: Yes, you can use either regular cream cheese or a lighter version, such as reduced-fat cream cheese. The texture and flavor may vary slightly, but it will still result in a delicious cheesecake.
Remember to have fun while making this festive Little Debbie Christmas Tree Cheesecake! It’s not only a treat for the taste buds but also a feast for the eyes. Enjoy the holiday season and the joy of creating delicious desserts that bring smiles to everyone’s faces.


