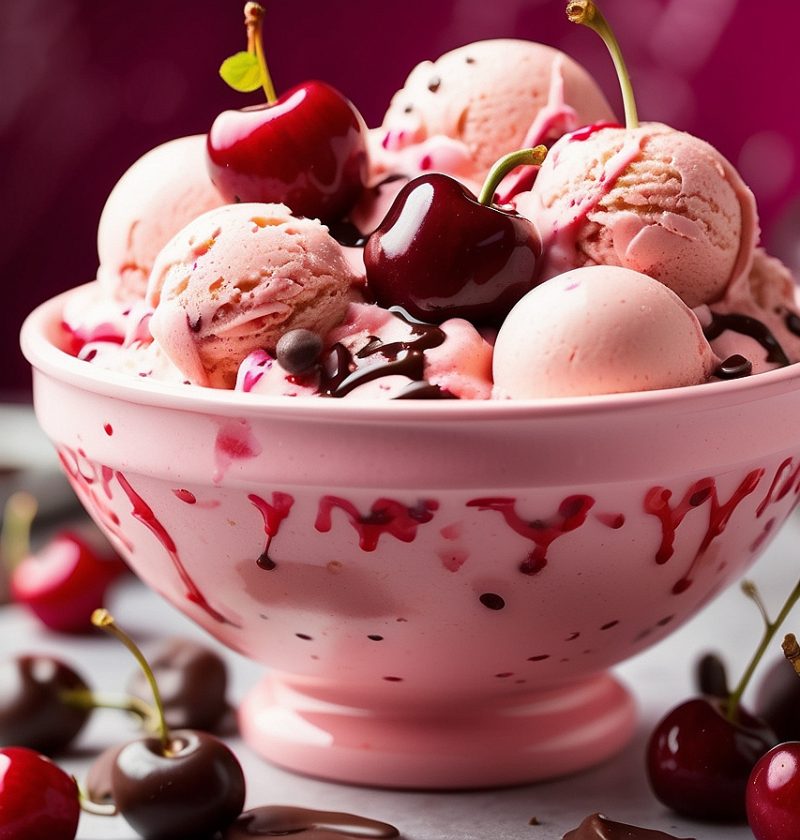
Indulge in the delightful flavors of our luscious cherry ice cream recipe. This frozen treat is a perfect blend of creamy goodness and the natural sweetness of cherries. Each spoonful will transport you to a heavenly realm of taste and refreshment. Whether you’re looking for a tasty dessert or a cool treat on a sunny day, this cherry ice cream recipe is sure to satisfy your cravings.
- Difficulty: Easy
- Prep Time: 15 minutes
- Cooking Time: 30 minutes (plus freezing time)
- Serving: 4
- Yield: Approximately 1 quart
- Calories: 250 per serving (estimated)
Ingredients:
- 2 cups (480 ml) fresh or frozen cherries, pitted
- 1 cup (240 ml) whole milk
- 1 cup (240 ml) heavy cream
- 3/4 cup (150 g) granulated sugar
- 4 large egg yolks
- 1 teaspoon vanilla extract
- 1/4 teaspoon almond extract
- A pinch of salt
Equipment:
- Ice cream maker
- Blender or food processor
- Mixing bowls
- Whisk
- Saucepan
Step-by-Step Guide:
Step 1: Prepare the cherries by removing the pits. If using frozen cherries, thaw them beforehand.
Step 2: In a saucepan, combine the milk, heavy cream, and half of the sugar. Heat the mixture over medium heat until it starts to simmer. Stir occasionally to prevent scorching.
Step 3: While the milk and cream mixture is heating, whisk the egg yolks and the remaining sugar in a separate bowl until well combined.
Step 4: Slowly pour the hot milk and cream mixture into the bowl with the egg yolks and sugar, whisking constantly. This step is important to temper the eggs and prevent them from curdling.
Step 5: Return the mixture to the saucepan and cook over low heat, stirring continuously, until it thickens slightly and coats the back of a spoon. This should take about 5-7 minutes. Do not let it boil.
Step 6: Remove the saucepan from the heat and stir in the vanilla extract, almond extract, and a pinch of salt. Allow the mixture to cool for a few minutes.
Step 7: Transfer the cherry ice cream base to a blender or food processor. Add the pitted cherries and blend until smooth. If you prefer small cherry chunks in your ice cream, blend for a shorter time.
Step 8: Pour the cherry ice cream base into a container and refrigerate for at least 4 hours or overnight until it is thoroughly chilled.
Step 9: Once chilled, pour the mixture into an ice cream maker and churn according to the manufacturer’s instructions until it reaches a soft-serve consistency.
Step 10: Transfer the churned ice cream into a lidded container and freeze for an additional 2-4 hours, or until firm.
Step 11: Scoop the cherry ice cream into bowls or cones, and garnish with fresh cherries or a drizzle of chocolate syrup, if desired. Enjoy the burst of cherry goodness!
Tips and Tricks:
- For a creamier texture, use whole milk and heavy cream. However, you can use reduced-fat milk and light cream for a lighter version.
- If you prefer a stronger almond flavor, you can increase the amount of almond extract slightly.
- Experiment with different types of cherries, such as Bing or Rainier cherries, to vary the flavor profile.
- To enhance the visual appeal, reserve a handful of cherries before blending and fold them into the ice cream during the last few minutes of churning.
- Remember to freeze the ice cream in an airtight container to prevent the formation of ice crystals.
Nutritional Information:
- Calories: Approximately 250 per serving (estimated)
- Fat: 16g
- Carbohydrates: 25g
- Protein: 4g
- Fiber: 2g
Final Thoughts:
Our cherry ice cream recipe is a delightful way to savor the vibrant taste of cherries in a frozen dessert. The creamy texture combined with the natural sweetness of the cherries creates a harmonious balance of flavors. So, gather your ingredients, follow the simple steps, and embark on a journey of sensory pleasure with every scoop of this heavenly cherry ice cream!
FAQ
Can I use frozen cherries instead of fresh ones to make Cherry Ice Cream?Absolutely! Frozen cherries work just as well in this Cherry Ice Cream recipe. Just make sure to thaw them before using.
Can I substitute the sugar with a sugar alternative in Cherry Ice Cream?Yes, you can use a sugar alternative that is suitable for baking in Cherry Ice Cream. Keep in mind that it may slightly alter the taste and texture.
Can I make Cherry Ice Cream without an ice cream maker?While an ice cream maker produces the best results for Cherry Ice Cream, you can still make this recipe without one. After Step 9, pour the mixture into a lidded container and place it in the freezer. Every 30 minutes, take it out and vigorously stir the mixture with a fork to break up any ice crystals. Repeat this process for about 3-4 hours or until the Cherry Ice Cream reaches the desired consistency.
How long can I store Cherry Ice Cream?Properly stored in an airtight container in the freezer, Cherry Ice Cream can be enjoyed for up to 2 weeks. However, for the best taste and texture, it is recommended to consume it within the first week.
Can I add other mix-ins to Cherry Ice Cream?Absolutely! Feel free to get creative and add your favorite mix-ins such as chocolate chips, crushed cookies, or chopped nuts to Cherry Ice Cream during the last few minutes of churning.
Can I use almond milk instead of whole milk in Cherry Ice Cream?While almond milk can be used as a substitute for whole milk in Cherry Ice Cream, keep in mind that it may result in a slightly different texture and flavor.
Can I use an alternative fruit instead of cherries in Cherry Ice Cream?Yes, you can experiment with different fruits like strawberries, blueberries, or peaches to create your own unique flavors of homemade Cherry Ice Cream.
Can I double the recipe to make a larger batch of Cherry Ice Cream?Absolutely! Simply double all the ingredients to make a larger quantity of Cherry Ice Cream.
Can I use a hand mixer instead of a whisk to make Cherry Ice Cream?Yes, a hand mixer can be used instead of a whisk to combine the egg yolks and sugar in Cherry Ice Cream. Just ensure that you mix until the mixture is well combined and slightly thickened.
Can I use vanilla extract instead of almond extract in Cherry Ice Cream?Yes, if you prefer to omit the almond flavor, you can use additional vanilla extract in Cherry Ice Cream. The ice cream will still be delicious.
Can I use a different sweetener instead of granulated sugar in Cherry Ice Cream?Yes, you can use alternative sweeteners like honey or maple syrup in Cherry Ice Cream. However, keep in mind that they may affect the texture and sweetness of the ice cream.
Can I use low-fat milk instead of whole milk in Cherry Ice Cream?Yes, you can use low-fat milk in Cherry Ice Cream, but it may result in a slightly less creamy texture.
Can I use a blender instead of a food processor to blend the cherries for Cherry Ice Cream?Yes, a blender works just as well to blend the cherries into a smooth consistency for Cherry Ice Cream.
Can I add a splash of alcohol to the Cherry Ice Cream mixture?Yes, you can add a splash of your favorite alcohol, such as cherry liqueur or amaretto, to enhance the flavor of Cherry Ice Cream. Just be mindful that it may affect the freezing time and texture.
Can I use canned cherries instead of fresh or frozen ones for Cherry Ice Cream?While fresh or frozen cherries are recommended for the best flavor in Cherry Ice Cream, you can use canned cherries in a pinch. Drain them well before blending into the ice cream base.