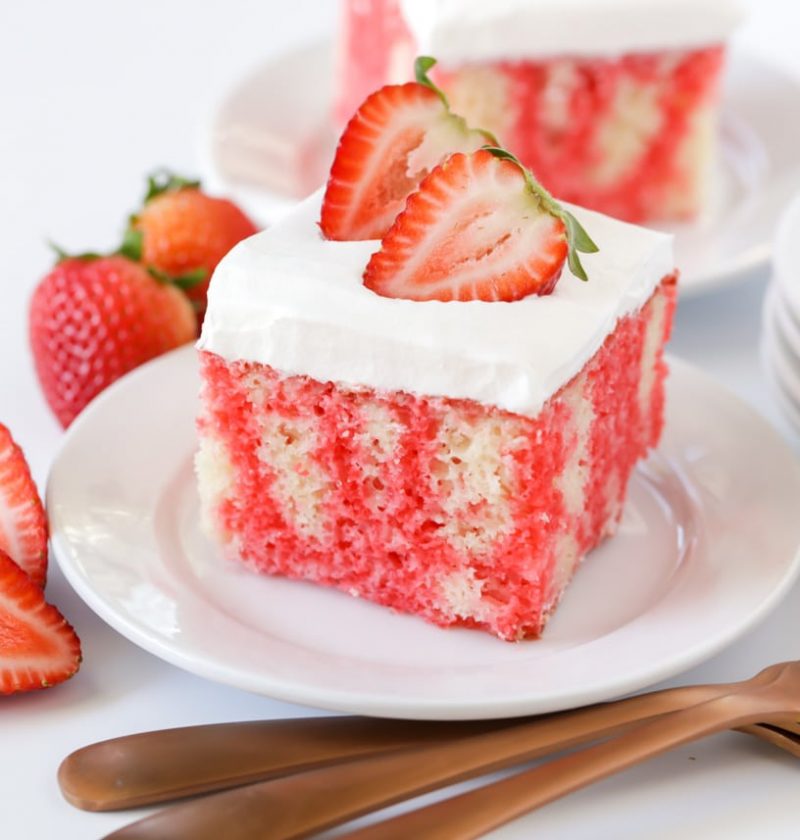
Indulge in a delightful dessert adventure with this irresistible Jello Poke Cake recipe. Bursting with vibrant colors, moist cake layers, and a refreshing jello surprise, this cake is sure to dazzle your taste buds and impress your guests. Perfect for parties, birthdays, or any sweet celebration, this cake combines the nostalgia of childhood jello with the elegance of a homemade cake. Get ready to embark on a journey of flavors and textures with each delightful bite.
Difficulty: Easy
Prep Time: 20 minutes
Cooking Time: 30 minutes
Serving: 12 servings
Yield: 1 9×13-inch cake
Calories: 320 calories per serving
Ingredients
- 1 box (15.25 oz / 432g) white cake mix
- 1 cup (240ml) water
- 1/3 cup (80ml) vegetable oil
- 3 large eggs
- 1 box (3 oz / 85g) fruit-flavored gelatin (choose your favorite flavor)
- 1 cup (240ml) boiling water
- 1/2 cup (120ml) cold water
- Whipped cream, for topping
- Fresh berries, for garnish (optional)
Equipment
- 9×13-inch baking pan
- Mixing bowls
- Whisk or electric mixer
- Skewer or fork for poking holes
- Spatula
- Refrigerator
Step-by-Step Guide
Step 1: Preheat your oven to the temperature specified on the cake mix box. Grease and flour a 9×13-inch baking pan.
Step 2: In a mixing bowl, combine the white cake mix, water, vegetable oil, and eggs. Beat the mixture with an electric mixer or whisk until smooth and well combined.
Step 3: Pour the cake batter into the prepared baking pan and spread it evenly.
Step 4: Bake the cake in the preheated oven for the time indicated on the cake mix box or until a toothpick inserted into the center comes out clean.
Step 5: While the cake is baking, prepare the jello by dissolving the fruit-flavored gelatin in boiling water. Stir until fully dissolved, then add cold water and mix well.
Step 6: Once the cake is baked, remove it from the oven and let it cool for a few minutes. Using a skewer or fork, poke holes all over the cake, spacing them about an inch apart.
Step 7: Carefully pour the prepared jello mixture over the warm cake, ensuring that the jello fills the holes. Pour slowly to allow the jello to penetrate evenly.
Step 8: Place the cake in the refrigerator and chill for at least 2 hours, or until the jello is set.
Step 9: Once the jello is set, spread a layer of whipped cream over the top of the cake. Garnish with fresh berries if desired.
Tips and Tricks
- Experiment with different flavors of gelatin to create a variety of colorful and flavorful combinations. Try strawberry, lime, orange, or even blue raspberry.
- For a more intense jello flavor, use half the amount of cold water called for in the jello instructions.
- Customize your cake by adding fresh fruit slices between the cake layers before pouring the jello. This adds an extra burst of freshness and texture.
- Make sure the cake has cooled slightly before pouring the jello over it. If the cake is too hot, the jello may not set properly.
- To speed up the chilling process, you can place the cake in the freezer for about 30 minutes instead of refrigerating it for a few hours.
Nutritional Information
Calories: 320 calories per serving
Fat: 12g
Carbohydrates: 48g
Protein: 4g
Fiber: 0g
Final Thoughts
Get ready to embark on a delightful dessert adventure with this Sparkling Jello Poke Cake. The combination of moist cake, fruity jello, and creamy whipped topping creates a symphony of flavors and textures that will leave you craving more. Whether you’re celebrating a special occasion or simply treating yourself, this cake is a guaranteed crowd-pleaser.
FAQ
Q1: Can I use a homemade cake instead of a cake mix?
A1: Absolutely! If you prefer to make a homemade cake, feel free to use your favorite white cake recipe instead of the cake mix. Just make sure the cake is baked and cooled before proceeding with the jello poking.
Q2: Can I use sugar-free gelatin for a healthier option?
A2: Yes, you can use sugar-free gelatin if you prefer a lower-sugar version of this cake. Follow theinstructions on the sugar-free gelatin box for the appropriate measurements and preparation.
Q3: Can I make this cake in advance?
A3: Yes, you can prepare the cake a day in advance. Simply cover it tightly with plastic wrap or store it in an airtight container in the refrigerator. Add the whipped cream and garnish just before serving for the best texture and presentation.
Q4: Can I use a different topping instead of whipped cream?
A4: Absolutely! While whipped cream adds a light and fluffy touch, you can get creative with your toppings. Cream cheese frosting, vanilla glaze, or even a dusting of powdered sugar would all work well with this cake.
Q5: Can I use a different size of baking pan?
A5: Yes, you can use a different size of baking pan, but keep in mind that the baking time may vary. Adjust the baking time accordingly and keep an eye on the cake to ensure it is fully baked.
Q6: Can I use fresh fruit instead of berries for garnish?
A6: Of course! Feel free to use any fresh fruit you prefer for garnish. Sliced strawberries, kiwi, or even mandarin orange segments would all add a vibrant and delicious touch to the cake.
Q7: Can I use flavored whipped cream instead of plain?
A7: Absolutely! Flavored whipped creams such as chocolate, strawberry, or even mint would add an extra layer of flavor to the cake. Use your favorite flavored whipped cream or make your own by adding extracts or flavorings to plain whipped cream.
Q8: How long can I store leftovers of this cake?
A8: You can store leftovers of this cake in the refrigerator for up to 3 days. Make sure to cover it well to prevent drying out. Enjoy the remaining slices as a delightful treat whenever your sweet tooth calls.


